常见问答
- M051 系列(95)
- M0518 系列(97)
- M0519 系列(43)
- M0564 系列(1)
- Mini51 系列(90)
- Nano100 / 102 系列(101)
- Nano103 Base 系列(10)
- Nano110 / 112 LCD 系列(100)
- Nano120 USB 系列(111)
- Nano130 USB+LCD 系列(110)
- NUC029 系列(94)
- NUC100 / 200 系列(102)
- NUC120 / 122 / 123 / 220 USB 系列(116)
- NUC121/125 系列(1)
- NUC126 USB 系列(2)
- NUC130 / 230 CAN 系列(103)
- NUC131/NUC1311 CAN 系列(98)
- NUC140 / 240 USB+CAN 系列(114)
- M451 Base 系列(118)
- M451M 系列(117)
- M452 USB 系列(130)
- M4521 USB 系列(1)
- M453 CAN 系列(128)
- M463 CAN FD/USB HS 系列(1)
- M467 Ethernet/Crypto 系列(1)
- M471 系列(1)
- M479 Motor Control Series(1)
- M481 Base 系列(4)
- M482 USB FS OTG 系列(4)
- M483 CAN 系列(4)
- M484 USB HS OTG 系列(4)
- M485 Crypto 系列(4)
- M487 Ethernet 系列(4)
- M4TK 触摸 IC 系列(25)
- NUC442 / 472 系列(130)
- NUC472 Series(1)
- NUC505 系列(138)
FAQ
How to change the Nu-Link Pro I/O voltage? Issue Date:2016-12-20
The Nu-Link Pro I/O voltage can be adjusted through the ICP Programming Tool, Keil RVMDK and IAR EWARM.
The steps are as follows:
- ICP Programming Tool
1. After the ICP Programming Tool is opened, click on the "Options" in the "Programming" section, as shown in Figure 1, to enable programming options.

Figure 1
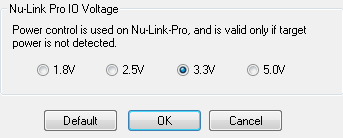
2. In the “Nu-Link Pro IO Voltage” section, select the Nu-Link Pro I/O Voltage, as shown in Figure 2.
 Figure 2
3. After clicking "OK", the Nu-Link Pro I/O voltage will be changed immediately.
- Keil RVMDK
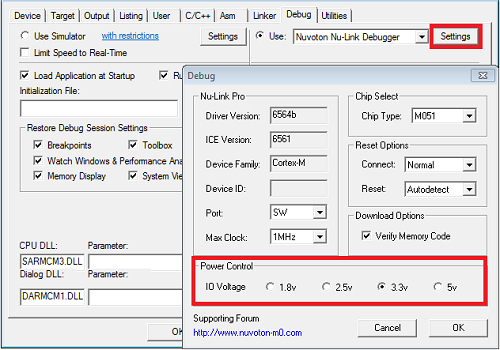
1. In the Project → Options for Target → Debug page, click "Settings" to open the "Debug" window, as shown in Figure 3.
 Figure 3
2. In the "Power Control" section, select the Nu-Link Pro I/O voltage.
3. The Nu-Link Pro I/O voltage can be changed only when the "Download" or "Start / Stop Debug Session" is executed.
- IAR EWARM
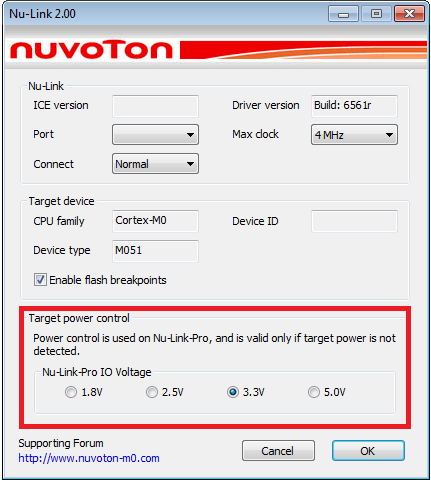
1. Open the Nu-Link settings window through Nu-Link→Nu-Link Monitor, as shown in Figure 4.
 Figure 4
2. In the “Target power control” section, select the Nu-Link Pro I/O voltage.
3. The Nu-Link Pro I/O voltage can be changed only when the “Download and Debug” or “Debug without Downloading” is executed.
| Products: | Microcontrollers ,Arm Cortex-M0 MCUs ,Arm Cortex-M4 MCUs |
|---|---|
| Applications: | |
| Function: | Software and Tools,Development-Environment,IAR,Keil,ICE & Downloader,Nu-Link-Pro (ICE),Nu Tools,In Circuit Programming (ICP) Tool |